Old School RuneScape has a numerous variety of items it offers to players. Some are better, some are worse, and they all have their own niche.
While there are tons of OSRS items, a handful of them have become iconic. Some are status symbols while others provide good stats. Today, we will be discussing an item that could easily make its way into either of those categories: the OSRS Infernal cape.
Complete Guide On How To Get The OSRS Infernal Cape
How Do You Get to Inferno?
Infernal Cape is a must-have for any player striving for greatness. To be rewarded the Infernal Cape a player must complete the Inferno minigame. To begin the minigame, you must first acquire a Fire cape, which is a lower-tier version of the Infernal cape, and give it to TzHaar-Ket-Keh. This is a one-time cost as TzHaar-Ket-Keh will not ask you for more Fire Capes on multiple visits to the Inferno.
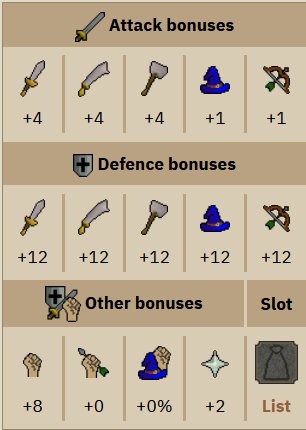
Infernal cape provides the best all-around stats for melee-oriented characters and only a couple of other items can be used instead of it and that only on very specific conditions.
Preparing for Inferno
Inferno minigame is one of the hardest if not THE hardest solo PvM challenges in OSRS. As such, brave adventurers must also be smart and bring sufficient supplies to the battle ahead.
Recommended Setup for Inferno:
- Ancient magicks
- Long-range weapon
- Blowpipe
- 11 Super restores
- 7 Saradomin brews
- 2 Ranging potions
- 1 Stamina potion
Make sure to use the best gear available to you and don’t forget to take your tactics into account and prepare accordingly (you might need different potions, for example). You will need to use prayer-flicking a lot, so make sure you are familiar with the technique and take time to practice.
The Inferno Layout
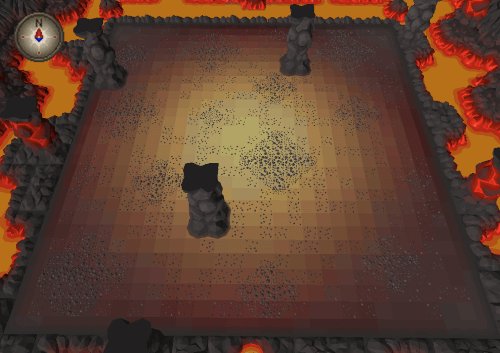
The Inferno is a hellish place, yet strangely neat and not at all as chaotic as you would expect. It is basically a square arena with three big pillars in it. You will be hugging these pillars throughout most of the minigame, so familiarize yourself with them.
The Infernal Monsters spawn in nine locations in the arena, in such a way that you can stay safe behind one of the pillars no matter the wave you’re on (you are most likely to use the northern one for the cover).
How to Clear Inferno
There are a total of 69 waves of monsters in the Inferno minigame. Each of these waves is more difficult than the last and at certain waves, you will face new challengers bent on destroying you.
This will force you to change your tactics depending on the new addition and the wave, so make sure to keep a mental note of the wave number to react quickly when the next one starts.
There are nine types of monsters you will encounter in the Inferno. Two types are healers and the other seven are damage dealers.
Monsters that deal damage can be safely spotted and played around while healers can be distracted and dispatched off without getting to do much healing.
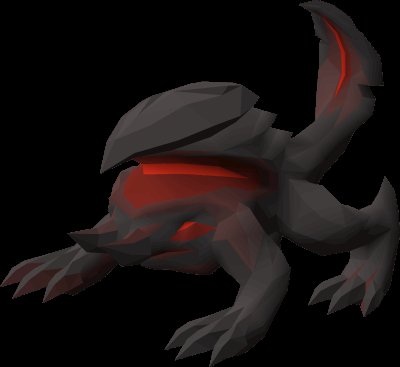
Nibblers
Nibblers are pesky little pests whose entire goal is to ruin any positioning strategy involving pillars. Once spawned, they will move to a pillar and nibble on it until it is destroyed.
Pillars are essential for clearing the Inferno so a player will always have to prioritize Nibblers. Thanks to Nibblers spawning in groups and having low Hitpoints they are extremely vulnerable to Area of Effect spells and attacks.
Bats
Bats can be safely spotted just behind the pillar. Their attacks deal minor damage but they also drain stats. You want to get hit by them as little as possible.
Bat attack range is four squares. Keep this in mind when moving so that you keep the Bats where you want them to be. You can also use other monsters to get Bats stuck behind them.
Blobs
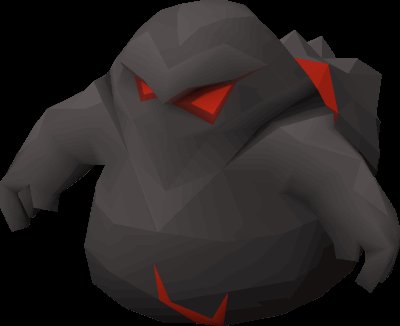
Blobs are annoying for they will make you flick your Prayers a lot. They use both Magic and Ranged attacks. The attack they choose depends entirely on what type of attack you’re praying against. If you pray Ranged, they will use Magic attack and vice versa.
To check whether you’re doing this right, attack a Blob while letting it hit you and quickly hide behind a pillar. This can take time to get used to - don’t beat yourself up if you don’t immediately succeed.
Once they die, Blobs spawn three smaller blobs, each corresponding to an attack style (Melee, Ranged, Magic). These little monsters are here more as an opportunity for you to heal by casting Blood Barrage than an actual threat.
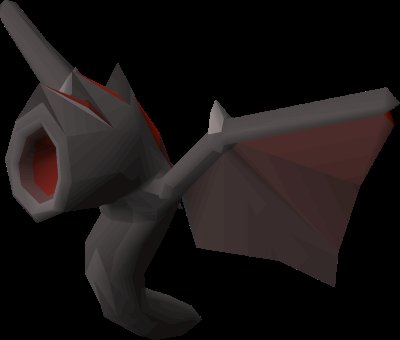
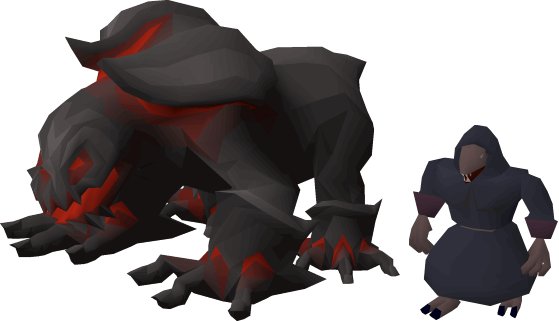
Melee
In order to survive the Inferno, you will need to use every little dirty trick at your disposal. Jal-ImKot, a.k.a. Melee is a creature that you will get to safe spot the most.
Melee monster is large, occupying 16 tiles. This allows for a little more freedom when manipulating its position or making a maneuver yourself.
A tactic known as corner safe spot can be used against these overgrown snakes. You need to stand on the corner of the monster’s hitbox to prevent it from making attacks. If it can’t hit you for a while, Jal-ImKot will teleport to another position around the player. Teleport locations follow a pattern, so keep your eyes peeled and you won’t get surprised.
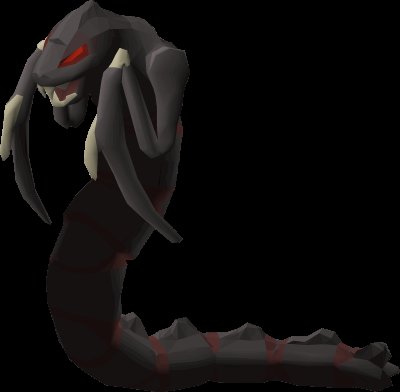
Ranger
Jal-Xil, the Ranger. Despite the name, the Ranger can also use melee attacks, though Ranged is it’s preferred style of combat. It attacks every 4 ticks and its low Defense makes it a good target for healing.
In most scenarios, Ranger will be a low priority target. Nevertheless, you should not miss a good opportunity to kill it if it presents itself.
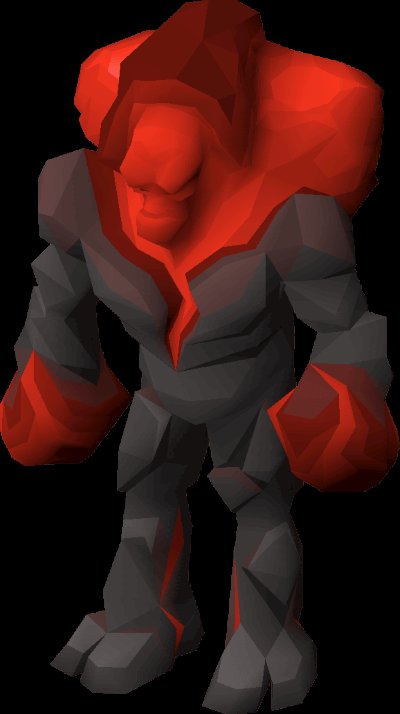
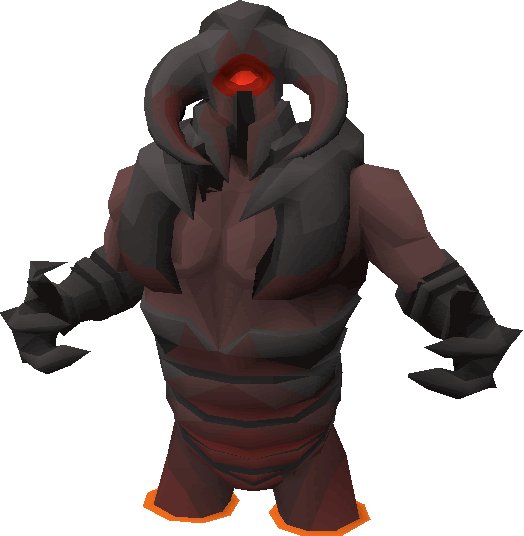
Mage
Jat-Zek is a creature that uses Mage attacks. These attacks are really powerful, hence you should always pray Protection Against Magic. The engagement tactics are almost identical to those of Ranger.
Mage has a unique ability to resurrect monsters that fell during the same wave. The revived monsters have half of their original HP. Due to this ability, you should make Mage your priority target.
If you can’t do this, then don’t worry too much – Mage can revive a fallen creature only once.
Bosses Before The Big Boss
For those who think that the Inferno is just a protracted version of the TzHaar Fight cave – you are sorely mistaken. The Inferno is on another level. Here, the last waves are just one boss fight after another.
Jads and Healers
Mechanics of Jads are the same as those of THE Jad that reward you with Fire Cape. The main difference is that Jads in the Inferno are a lot more tenacious and have plenty of little helpers to make an adventurer's life into a living hell. Yt-HurKot’s will spawn during the fight to heal their Jad.
They can be distracted by the player and either eliminated or tanked until the big dog is put down. If you choose to tank the healers, simply make them line up one behind another so that only a single healer can hit you.
The best method to deal with them is to get them stuck behind Jad. This way they will be aiming at you, but unable to deal damage to you or heal Jad, which is a total win-win situation for you.
To do so, aggro all healers, make them come to you, and then run to the other side of Jad during his Magic/Ranged attack.
Triple Trouble
On the 68th wave, you will encounter three Jads. The downside is obvious, the upside is that once a Jad reaches 50% health, only three healers will spawn. The tactics of dealing with them are the same as with a single Jad.
The Inferno Boss
TzKal-Zuk, the behemoth of the Inferno is the final boss of the minigame. This titanic monster inspires fear and awe and hits like a truck. The tactics change completely at this stage of the minigame.
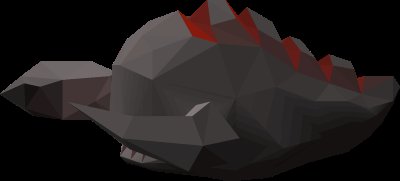
First, TzKal-Zuk will push aside a pillar of stone to set itself free and attack the player. The stone moves in the lava river providing cover for the player. Make sure to stand behind the wall or you will perish.
Second, don’t think that you will get off that easy by just hiding behind the shield. After 3.5 minutes Range and Mage monsters will spawn that will attack the shield. You will have to aggro them and kill them or else they will destroy the shield, leave you exposed, and TzKal-Zuk will end you.
Third, once TzKal-Zuk reaches 50% health (600 HP), there will be a short break from continuous monster spawning. Heal during this time and recover your energy – you will need it.
Fourth, once you reduce TzKal-Zuk’s HP to 480 it will call forth Jads to attack the shield. Jads will summon healers, but you know how to deal with them already.
Fifth, at 240 HP four Jal-Mejjak’s will spawn to rapidly heal TzKal-Zuk, and TzKal-Zuk itself will enrage, attacking at a faster pace. Run with the shield to survive. Healers will shoot AoE fireballs at the player if attacked and Mage and Ranged monsters will keep spawning. This is the ultimate test of your abilities.
Killing TzKal-Zuk will despawn its minions regardless of their HP. Keep this in mind as it can be easier to finish off the big boss instead of its minions.
Best OSRS Inferno Tips and Tricks
Remember if there are a lot of monsters in a group, you can always move them around a bit while being behind a pillar. Make sure that you do not move out of the safe zone while doing this. Moving within the zone, however, will let you stack monsters in a way that allows you to engage them on your terms.
When the monsters in the stack no longer change position in relation to each other, you can try freezing them.
Always try to put the monsters in such a position that enables you to pick them off one by one. This will not only save you Prayer points and some intensive clicking but also reduce the risk of losing the minigame.
One death in Inferno means that you must start from the beginning, although you can logout to pause the game. It’s better to take a break from the intense fighting than going on the next wave burnout and lose all the OSRS gold you’ve invested in supplies.
If you ran out of OSRS GP, you can always come to us and buy cheap OSRS gold. We can deliver your gold within a few minutes.
Now, if two monsters are safe spotted behind a pillar and are in a single line, the monster in the back will hit you first once you leave the safety of the pillar. Use this to cast appropriate Prayer and keep in mind that you can click on the monster in the back to step outside safety and attack it, rather than having to click twice – the first click to move and then a second one to attack.
Throughout all waves in the Inferno, the best spot to hide behind and use to position monsters is the northern pillar. You can use others and sometimes may have to.
In such cases, it is recommended to move to the southern pillar while praying Mage, equipping the tankiest gear, and drinking potions, if necessary. The problem with the south pillar is that monsters can go around it and reach you.
Final Thoughts About The Infernal Cape in OSRS
We hope you will find this OSRS Infernal Cape Guide of ours will be useful on your Inferno runs. If you die once or twice, don’t make a big deal out of it – nobody completed the Inferno on their first attempt.
We wish you good luck and go get that OSRS pet!
If you ever run out of supplies trying to beat it you can buy some RuneScape gold from Probemas.
If you don't feel like this challenge is for you, we offer Infernal cape services, so you wouldn't have to endure this painful but rewarding grind.
Need help with your OSRS journey? Join our Discord server and try out our other RuneScape services like power leveling, fire cape, questing, and many more.